หน้าแรก
» คอมพิวเตอร์
»
How to Fix “Windows 12 System Requirements Not Met” TPM 2.0 Error — What’s Actually Verified
How to Fix “Windows 12 System Requirements Not Met” TPM 2.0 Error — What’s Actually Verified
Short answer: if a PC shows a “Windows 12 system requirements not met” message that blames TPM 2.0, verify the source of that message before changing firmware settings. As of September 13, 2026, Microsoft’s public Windows release-health pages identify supported client releases as Windows 11, including versions 26H1, 25H2, and 24H2. Microsoft also documents PC Health Check as a Windows 11 eligibility tool. I could not verify an official Microsoft Windows 12 system-requirements page or an official Microsoft PC Health Check result for Windows 12. See the current Microsoft Windows release health page and Microsoft PC Health Check documentation.
That does not mean you should ignore TPM. TPM 2.0 is a verified Windows 11 requirement, and the same TPM warning can appear in legitimate Windows 11 compatibility checks. The safest approach is to separate the unverified “Windows 12” label from the technical question: does your PC actually have TPM 2.0 enabled and ready?
What is verified, what depends on your PC, and what is not verified?
Claim
Status
What to do
Windows 11 requires TPM 2.0.
Verified by Microsoft.
Use Windows tools to check the TPM specification version before changing anything.
A PC can support TPM 2.0 even when Windows says no compatible TPM is found.
Verified, but device-dependent.
Check UEFI/BIOS for firmware TPM settings such as Intel PTT, AMD fTPM, or Security Device Support.
TPM 2.0 always requires a separate physical TPM module.
False as a general rule.
Look for firmware TPM first; Microsoft explicitly lists Intel PTT and AMD fTPM among possible firmware labels.
Microsoft has published official “Windows 12” TPM requirements.
Not verified in Microsoft’s current public documentation as of September 13, 2026.
Treat a Windows 12-branded checker or setup screen as unverified unless you can trace it to an official Microsoft source.
Microsoft’s current Windows 11 system requirements list TPM 2.0 separately from UEFI and Secure Boot capability. That distinction matters: fixing TPM does not automatically fix every other compatibility requirement.
Before you change UEFI or TPM settings, protect access to encrypted data
A common mistake is to jump directly into firmware settings, clear the TPM, or update TPM firmware. That can create a BitLocker recovery prompt. Microsoft documents that changing, disabling, or clearing the TPM, as well as some UEFI/BIOS changes, can cause BitLocker to require its recovery key. Review Microsoft’s BitLocker FAQ before making firmware changes.
Action: make sure you know whether BitLocker or Device Encryption is enabled and that you can access the recovery key. On a work-managed PC, contact your IT administrator before changing TPM, Secure Boot, or boot-mode settings. Do not use “Clear TPM” as a routine first fix.
Step 1: Check TPM with tpm.msc
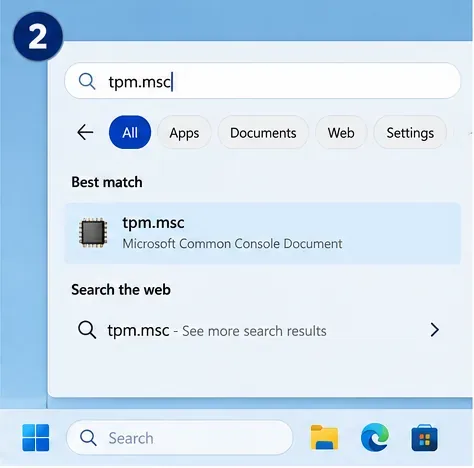
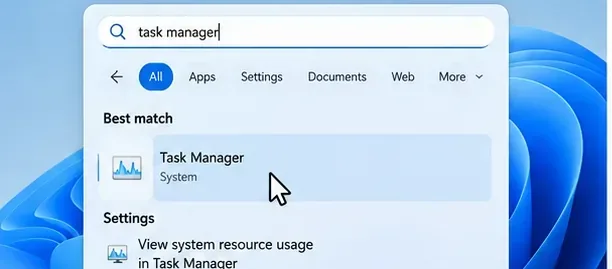
Press Windows + R, type tpm.msc, and press Enter. Microsoft specifically recommends this console as one of the ways to determine whether TPM is present and whether the specification version is 2.0.
Open the built-in TPM management console by searching for tpm.msc. This check does not depend on any Windows 12-branded utility.
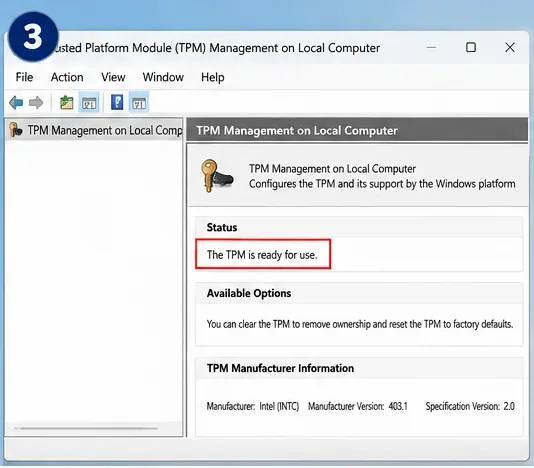
Look for two items in the TPM Management window: the status should say that the TPM is ready for use, and Specification Version should be 2.0. Microsoft’s Enable TPM 2.0 support page documents the same test.
Action: if TPM is ready and the specification version is 2.0, stop trying to “enable TPM” again. Your TPM 2.0 requirement is already satisfied, so the remaining problem is likely a stale compatibility result, a different system requirement, or an unverified checker.
Step 2: Interpret the TPM result before touching UEFI
A healthy TPM check shows “The TPM is ready for use” and Specification Version 2.0 in the TPM Management console.
What you see
Likely meaning
Next action
“The TPM is ready for use” and Specification Version 2.0
TPM 2.0 is working.
Skip firmware changes and go to Step 4.
“Compatible TPM cannot be found”
The TPM may be disabled in firmware, or the hardware may not provide a compatible TPM.
Check the manufacturer’s UEFI/BIOS instructions.
Specification Version 1.2
The TPM does not meet the verified Windows 11 TPM 2.0 requirement.
Check the exact PC or motherboard model for a manufacturer-supported TPM 2.0 firmware path. Do not assume a generic conversion is possible.
No Security processor section in Windows Security
Microsoft says the system may lack TPM hardware or TPM may be disabled in UEFI.
Check firmware support before buying hardware or changing unrelated settings.
One subtle point: firmware TPM is still TPM. Microsoft lists labels including Intel PTT, Intel Platform Trust Technology, AMD fTPM, AMD PSP fTPM, Security Device, and Security Device Support. A discrete add-in TPM module is not automatically required.
Action: write down the exact message from tpm.msc. That result determines whether you should enter UEFI at all.
Step 3: Enable TPM in UEFI only if it is disabled
หาก Windows ไม่พบ TPM ที่เข้ากันได้ แต่เอกสารของพีซีหรือเมนบอร์ดระบุว่ารองรับ TPM 2.0 ให้เข้าไปที่การตั้งค่าเฟิร์มแวร์ของระบบ คุณสามารถใช้คีย์บูตของผู้ผลิตหรือสภาพแวดล้อมการกู้คืนของ Windows และ ตัวเลือก การตั้งค่าเฟิร์มแวร์ UEFIได้ (หากมี) ชื่อเมนูจะแตกต่างกันไปตามผู้ผลิตและรุ่น ดังนั้นจึงไม่มีเส้นทางการคลิกเดียวที่เป็นสากลภายใน UEFI
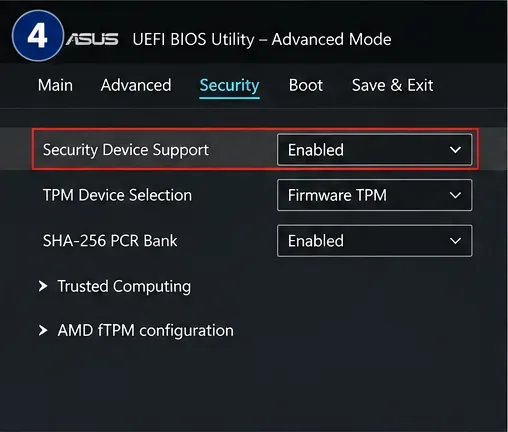
ตัวอย่างการควบคุม UEFI TPM เอกสารของ ASUS ใช้ Security Device Support และ Trusted Computing บนระบบที่รองรับ ผู้ผลิตรายอื่นอาจใช้ Intel PTT, AMD fTPM หรือตำแหน่งเมนูที่แตกต่างกัน
ตัวอย่างเฟิร์มแวร์ข้างต้นสอดคล้องกับเอกสารของ ASUS สำหรับระบบที่รองรับ: ASUS อธิบาย เส้นทาง Advanced > Trusted Computingโดย ตั้งค่า Security Device Supportเป็น Enable ในรุ่นที่เกี่ยวข้อง โปรดดู คำแนะนำการสนับสนุน TPM อย่างเป็นทางการของ ASUS พีซีของคุณอาจมีลักษณะแตกต่างออกไป ดังนั้นโปรดใช้หน้าสนับสนุนสำหรับรุ่นของคุณโดยเฉพาะ แทนที่จะคัดลอกเมนูของผู้ผลิตรายอื่นโดยไม่ตรวจสอบให้ดี
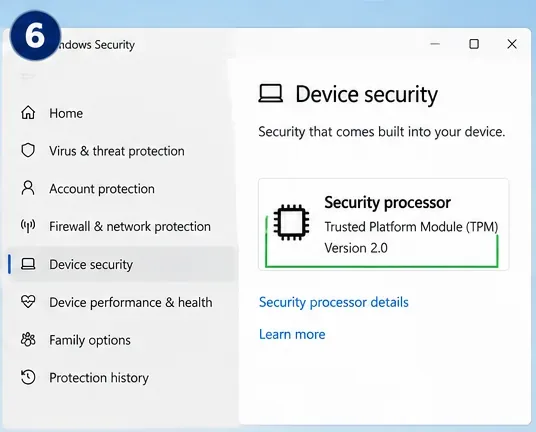
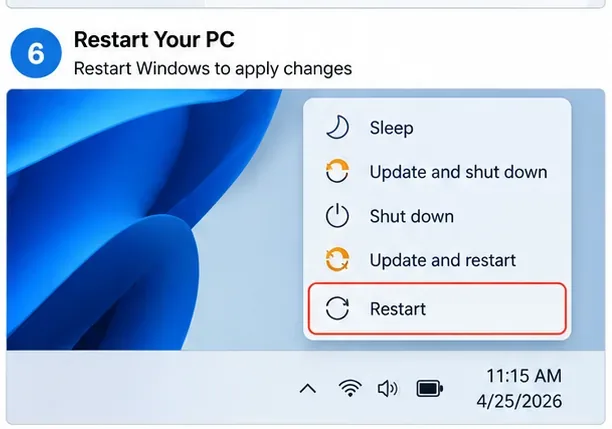
ใช้โปรแกรมรักษาความปลอดภัยของ Windows เพื่อตรวจสอบว่าตัวประมวลผลความปลอดภัยปรากฏขึ้นหลังจากรีสตาร์ท และ TPM 2.0 พร้อมใช้งานหรือไม่
ถัดไป ให้ใช้แอป PC Health Check อย่างเป็นทางการ หากคุณกำลังประเมินความพร้อมในการอัปเดต Windows 11 ไมโครซอฟต์ระบุว่า หลังจากมีการเปลี่ยนแปลงฮาร์ดแวร์หรือเฟิร์มแวร์ ข้อมูลความพร้อมในการอัปเดต Windows อาจใช้เวลาถึง 24 ชั่วโมง PC Health Check เป็นวิธีที่เร็วกว่าในการตรวจสอบความเข้ากันได้ล่าสุด
“โปรแกรมตรวจสอบความเข้ากันได้ใดๆ ที่ระบุว่ารองรับ Windows 12 นั้นเป็นโปรแกรมตรวจสอบความเข้ากันได้ที่เป็นทางการจาก Microsoft”
คุณไม่ควรคิดไปเองแบบนั้น ณ วันที่ 13 กันยายน 2026 เอกสารเผยแพร่และเอกสารสนับสนุนของ Microsoft ที่ใช้ในบทความนี้ระบุว่าระบบปฏิบัติการ Windows เวอร์ชันปัจจุบันคือ Windows 11 และเอกสารเกี่ยวกับคุณสมบัติการใช้งาน Windows 11 ใน PC Health Check ระบุว่าไม่มีข้อมูลเพียงพอ ฉันไม่สามารถตรวจสอบความถูกต้องของหน้าข้อกำหนดระบบ Windows 12 ที่เผยแพร่โดย Microsoft ได้
ขั้นตอนการดำเนินการ:ตรวจสอบผู้เผยแพร่แอป ตำแหน่งดาวน์โหลด ลายเซ็นดิจิทัล และหน้าแหล่งที่มาของ Microsoft ก่อนที่จะเชื่อถือผลลัพธ์ความเข้ากันได้ที่ระบุว่าใช้ได้กับ Windows 12
คุณควรละเว้นข้อกำหนด TPM หรือไม่?
สำหรับ Windows 11 นั้น Microsoft ระบุว่าไม่แนะนำให้ติดตั้งบนฮาร์ดแวร์ที่ไม่ตรงตามข้อกำหนดขั้นต่ำ อุปกรณ์ดังกล่าวไม่ได้รับการสนับสนุน และไม่รับประกันการอัปเดต โปรดดูคำแนะนำของ Microsoft สำหรับฮาร์ดแวร์ Windows 11 ที่ไม่ได้รับการสนับสนุนสำหรับข้อกำหนด "Windows 12" ที่ไม่ได้รับการตรวจสอบนั้น คำแนะนำในการข้ามข้อกำหนดจากบุคคลที่สามนั้นตรวจสอบได้ยากยิ่งขึ้น เนื่องจากไม่มีข้อกำหนดพื้นฐานอย่างเป็นทางการของ Microsoft Windows 12 ให้เปรียบเทียบในเอกสารสาธารณะปัจจุบัน
หลังจากเปิดใช้งาน TPM แล้ว ให้ตรวจสอบใน Windows Security และเรียกใช้โปรแกรมตรวจสอบสุขภาพพีซีอย่างเป็นทางการอีกครั้งเพื่อตรวจสอบว่าพีซีของคุณมีคุณสมบัติเหมาะสมสำหรับ Windows 11 หรือไม่